If you want to make yogurt that’s creamy, fresh, and tailored to your taste, a yogurt maker makes the process easy. You just heat your milk, let it cool, add a starter, incubate, and then chill your homemade yogurt. Many people love to make yogurt at home because you get:
More probiotics and nutrients than many store brands
A yogurt that’s easier to digest with fewer additives
Full control over sweetness and flavor
Less plastic waste and more savings
Take a look at how homemade yogurt compares to milk:
| Food | Calories | Fat | Carbohydrates | Protein |
|---|---|---|---|---|
| Whole Milk Yogurt | ~149 kcal | 8.0g | 11.4g | 8.5g |
| Whole Milk | ~146 kcal | 7.9g | 11.0g | 7.9g |
You can make yogurt at home even if you’re new to it. You’ll love the taste and the health benefits.
Making yogurt at home is easy. You can pick the flavor and sweetness. You also choose the ingredients. This makes it a healthier snack.
Heat milk to 180°F. This kills bad bacteria. It also helps yogurt get thick and creamy. Cool the milk to 110°F before you add the starter.
Use fresh yogurt starter with live cultures. Keep the temperature steady between 105°F and 115°F. This gives the best results.
Chill your yogurt after incubation. This makes the texture firm. Add flavors like fruit or vanilla after chilling. This keeps it creamy.
Store homemade yogurt in clean, airtight containers. Keep it in the fridge for up to two weeks. Enjoy it in many tasty ways.
You do not need many things to make yogurt at home. The basics are easy to find:
Milk (pick the kind you like best)
Yogurt starter (plain yogurt with live cultures or a powdered starter)
You can try different milks if you want to experiment. Here is a quick guide to how each milk works for yogurt:
| Milk Type | Effectiveness for Homemade Yogurt | Notes and Recommendations |
|---|---|---|
| Whole Milk | Makes the creamiest yogurt, especially non-homogenized | More fat gives a creamy texture; cream rises to the top; best if pasteurized, not ultra-pasteurized |
| Skim Milk | Makes yogurt that is thinner | Less fat means less creamy yogurt |
| Pasteurized Milk | Good for thicker yogurt | Ultra-pasteurized milk does not work well for yogurt |
| Non-Dairy Milk | Needs vegan starters and thickeners | Use coconut, almond, oat, or rice milk; add agar agar or gelatin to thicken |
| Goat Milk | Makes yogurt with smaller curds and is more runny | Might help with inflammation |
| Sheep Milk | Makes sweeter yogurt with more protein | Has twice as much protein as cow milk |
| Buffalo Milk | Makes yogurt that is thick and rich | Has more fat than cow milk |
| Raw Milk | Makes thinner yogurt and has safety risks | Has natural bacteria and is not processed |
| Powdered Milk | Used to make yogurt thicker | Full-fat powdered milk is best |
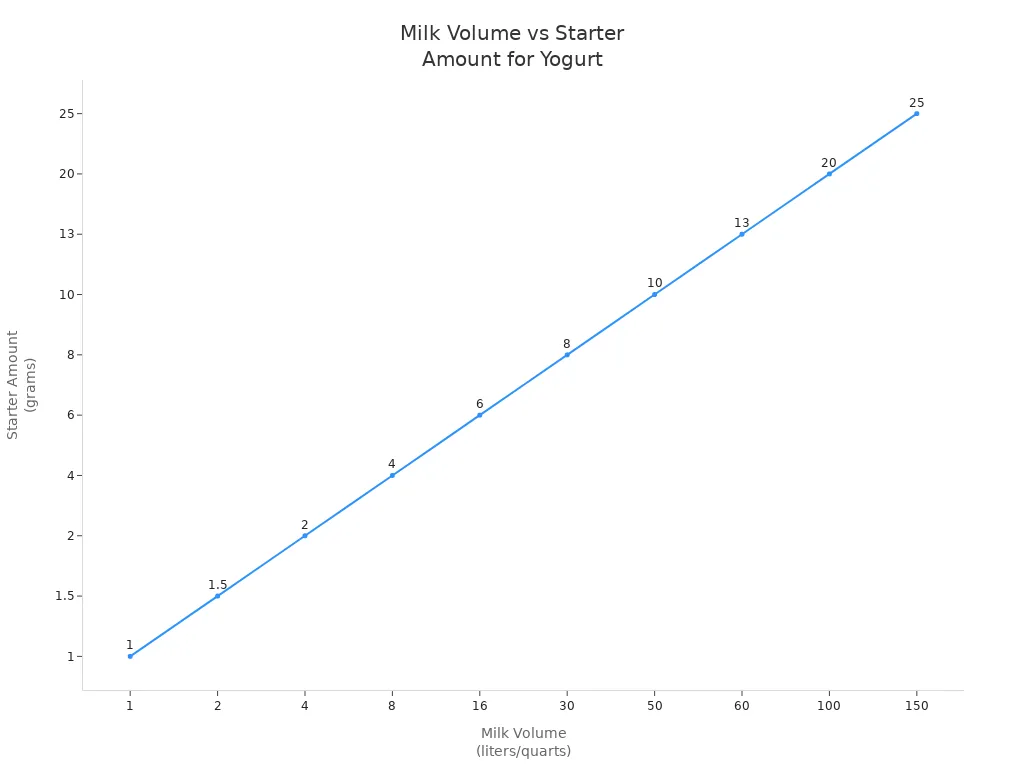
You also need the right amount of starter. Here is a table to help you know how much starter to use with your milk:
| Starter Amount (grams) | Milk Volume (liters/quarts) |
|---|---|
| 1 | 1 |
| 1.5 | 2 |
| 2 | 4 |
| 4 | 8 |
| 6 | 16 |
| 8 | 30 |
| 10 | 50 |
| 13 | 60 |
| 20 | 100 |
| 25 | 150 |
Most people use about 2 to 4 tablespoons of plain yogurt starter for every 2 quarts of milk. If you make more yogurt, just add more starter in the same way. This helps the good bacteria in the yogurt grow strong.
Tip: Enough starter helps your yogurt cultures grow and makes your yogurt thick and tasty. Keep your milk warm for the best yogurt!
You do not need special tools to make yogurt, but some things help a lot:
Yogurt maker or electric yogurt maker (keeps the temperature steady)
Inner tank or container (for the milk and starter)
Measuring cups and spoons
Whisk or spoon for mixing
Thermometer (optional, helps check milk temperature)
Strainer (optional, for Greek-style yogurt)
Clean jars or containers for storing your yogurt
Always wash your equipment with hot water and soap before you start. Clean tools help the yogurt cultures work well. You do not need strong chemicals, but keeping things clean is important. If you want, you can rinse your jars and tank with boiling water to be extra safe. This step helps keep your yogurt fresh and free from bad bacteria.
Note: The yogurt maker keeps your yogurt at the right temperature for fermentation. Clean equipment helps your yogurt turn out smooth and tasty every time!
Start by pouring your milk into the clean inner tank or container. Place it in your yogurt maker or heat it gently on the stove. You want to bring the milk up to 180°F. Use a thermometer if you have one. This step does two important things:
It kills any unwanted microbes, so only the good bacteria from your starter will grow.
It changes the proteins in the milk, which helps your yogurt turn out thick and creamy.
Here’s a quick look at what happens when you heat milk:
| Scientific Reason | Explanation | Outcome |
|---|---|---|
| Denaturation of whey proteins | Heating milk to 180°F unfolds proteins, letting them bind with others | Firmer, thicker yogurt curd |
| Killing wild bacteria | Heating to 180°F removes unwanted microbes | Only beneficial bacteria grow |
| Higher temperatures | More protein changes and better sterility | Thicker, milder yogurt |
If you like a thinner, tangier yogurt, you can heat the milk a little less. For a thicker, milder yogurt, keep the milk at 180°F for a few minutes. Stir the milk gently as it heats to keep it from scorching.
Tip: Heating the milk is the secret to that classic, spoonable yogurt texture!
Once your milk reaches 180°F, take it off the heat. Let it cool down to 110°F–115°F. This is the perfect range for adding your starter. If the milk is too hot, it can kill the yogurt cultures. If it’s too cold, the cultures won’t grow well.
You can speed up cooling by placing the container in a cold water bath. Stir gently to help the milk cool evenly. The cooling step is important because it affects the final texture. If you cool the milk too quickly or let it get too cold, your yogurt might turn out runny or separate. Aim for a steady, gentle cool-down.
❄️ Note: The right cooling temperature helps your yogurt set with a smooth, creamy texture.
When your milk is at 110°F–115°F, it’s time to add the starter. Use plain yogurt with live and active cultures or a powdered starter. Add the right amount for your batch and whisk it in gently. Make sure the starter mixes well with the milk, but don’t whip in too much air.
Adding the starter at this temperature gives the yogurt cultures the best chance to grow strong. These active cultures turn the milk into yogurt by fermenting the natural sugars.
Tip: Always use fresh starter for the best results. Old or weak starter can lead to yogurt that doesn’t set.
Now, pour the milk and starter mixture into your yogurt maker or electric yogurt maker. Set the temperature to 110°F–115°F. This is the sweet spot for making yogurt. Close the lid and let the mixture sit undisturbed.
Incubation time can vary. For mild, creamy yogurt, incubate for about 4 hours. If you want a tangier flavor, let it go for 8–12 hours. Some people even incubate overnight. Just remember, longer incubation makes the yogurt more tart and can sometimes make it grainy or cause whey to separate.
Here are some tips for this step:
Keep the temperature steady between 105°F and 115°F.
Don’t move or shake the yogurt maker during incubation.
Use fresh starter and sanitized equipment for the best results.
Common mistakes during incubation include setting the temperature too high, which can make the yogurt grainy, or stirring the yogurt after it starts to set, which can make it runny. Let the yogurt rest quietly so the cultures can work their magic.
⏳ Note: The longer you incubate, the tangier your yogurt will taste. For extra-thick yogurt, strain it after incubation instead of incubating longer.
When the incubation time is up, your yogurt is almost ready. Place the containers in the refrigerator and let them chill for at least one hour. Chilling helps the yogurt firm up and develop its final texture. Most people like to chill their yogurt for several hours or even overnight.
Don’t stir the yogurt right away. Let it set in the fridge so it stays thick and creamy. Chilling also helps preserve the sweetness and keeps the yogurt fresh.
Tip: Patience pays off! Chilling your yogurt gives it that perfect, scoopable consistency.
Now you know how to make yogurt at home, step by step. With a little practice, you’ll find the routine that works best for you. Enjoy experimenting with different milks, starters, and incubation times to create your perfect homemade yogurt.
You want your homemade yogurt to turn out thick and creamy every time. Here are some steps you can follow:
Pick a starter yogurt that does not have additives like pectin or gelatin. These can make your yogurt grainy.
Use about 1–2 tablespoons of starter per quart of milk. Too much starter can make your yogurt lumpy.
Mix the starter into the cooled milk (100–110°F) until it is smooth.
Heat your milk slowly to 170–180°F. Do not let it go above 190°F.
Choose whole milk or add a bit of milk powder for extra creaminess. Homogenized milk helps keep the texture smooth.
Tip: The type of milk you use matters. Whole milk or farm-fresh milk makes thicker, creamier yogurt than skim or ultra-pasteurized milk.
Sometimes, homemade yogurt does not turn out as you expect. Here are some common problems and how you can fix them:
Yogurt is too thin: This can happen if you use low-fat milk or if the incubation temperature is off. Try using whole milk or add some milk powder. Make sure your yogurt maker keeps the temperature steady.
Yogurt did not set: Old starter or ultra-pasteurized milk can cause this. Always use fresh starter and avoid ultra-pasteurized milk.
Grainy or lumpy yogurt: Too much starter or overheating the milk can cause this. Stick to the right amount of starter and heat the milk gently.
Non-dairy yogurt is runny: Add a thickener like agar agar or cornstarch before heating.
Note: Clean all your tools well before you start. This helps your homemade yogurt turn out perfect every time.
You can make your homemade yogurt taste just the way you like. Try these ideas:
Add fruit purees, jams, or honey after your yogurt has set and chilled.
Mix in a few drops of vanilla, almond, or coconut extract for extra flavor.
For a chocolate treat, stir in cocoa powder and a little sweetener.
Make savory yogurt by adding herbs like dill or basil.
| Flavor Type | How to Add Without Losing Creaminess |
|---|---|
| Fruit | Use purees or jams, not too much juice |
| Extracts | Add a few drops per cup |
| Sweeteners | Try honey or maple syrup in small amounts |
| Savory | Mix in herbs or cooked veggies for dips |
Tip: Add flavors after chilling so your yogurt stays thick and creamy.
If you want extra-thick homemade yogurt, you can make Greek-style yogurt at home. Here’s how:
After your yogurt has finished incubating, let it cool.
Line a strainer with cheesecloth and place it over a bowl.
Pour the yogurt into the strainer and let it drain in the fridge for 2 hours or overnight.
The longer you strain, the thicker your yogurt will get.
You can use the leftover liquid (whey) in smoothies or baking. Greek-style yogurt is great for breakfast bowls or as a creamy dip.
Tip: Straining your homemade yogurt gives you a rich, spoonable treat that is perfect for snacks or desserts.
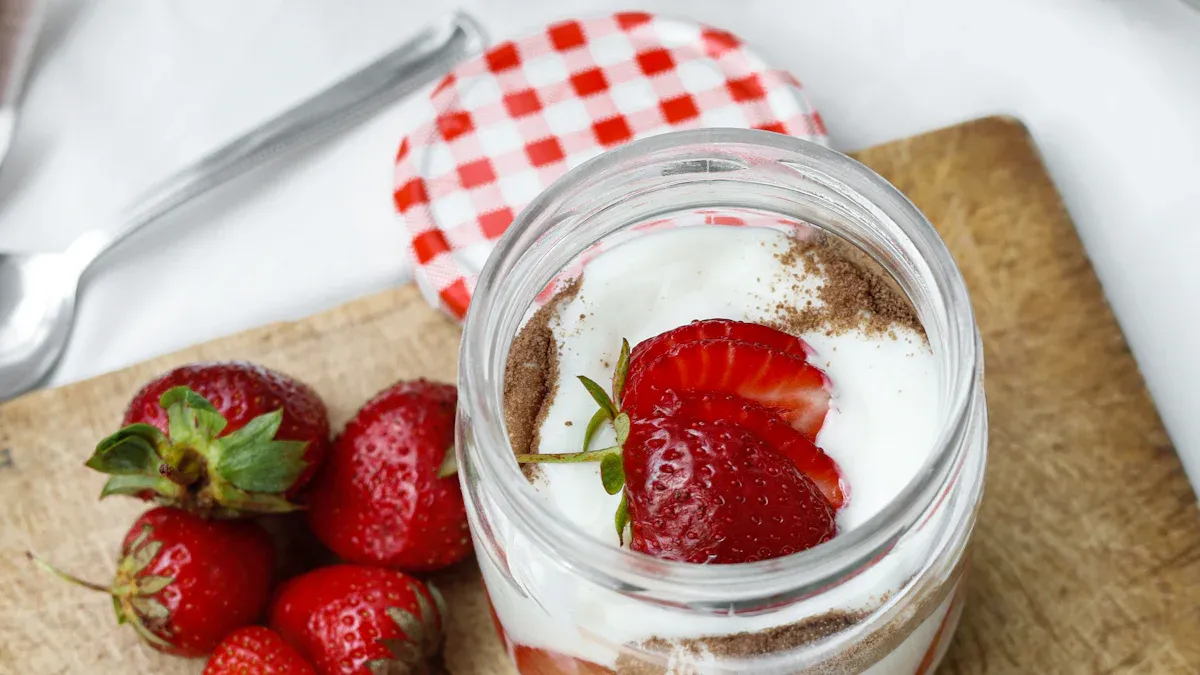
Image Source: pexels
You want your homemade yogurt to stay fresh and safe. Always store yogurt in clean, airtight containers. Place it in the refrigerator as soon as it finishes chilling. Keep your fridge at 40°F or below. This slows down bacteria and keeps your yogurt tasting great.
Here’s a quick guide for storing yogurt:
| Storage Condition | Safe Storage Duration for Yogurt |
|---|---|
| Refrigerator (40°F or below) | 1 to 2 weeks |
| Room Temperature (50–70°F) | Not safe |
| Freezer (0°F or below) | 1 to 2 months (quality only) |
You should never leave yogurt out at room temperature for more than 2 hours. If you do, throw it away. Watch for signs that your homemade yogurt has spoiled. These include a lumpy or gelatinous texture, a sour or off smell, mold, or a bloated container. If you see any of these, do not eat the yogurt.
Tip: If your yogurt smells weird, looks moldy, or tastes off, it’s time to toss it!
Homemade yogurt is super versatile. You can use it in so many ways, from breakfast to dinner and even dessert. Here are some fun ideas:
Make a creamy dip like tzatziki or French onion dip for veggies and chips.
Add yogurt to pancake or muffin batter for extra moisture and flavor.
Mix yogurt with fruit compote or honey for a quick breakfast.
Use yogurt as a marinade for chicken to make it tender and juicy.
Swap out sour cream for yogurt in dips, dressings, or baked goods.
Create frozen yogurt popsicles with fruit for a cool snack.
Top your yogurt with granola, nuts, or fresh berries for crunch.
Try trendy mix-ins like brownie sundae, key lime, or salted caramel for a fun twist.
Make a yogurt-based ranch dip for veggies or chips.
Stir yogurt into smoothies for a protein boost.
You can also get creative with toppings. Many people love adding granola, chocolate, or fruit flavors like strawberry, coconut, or blueberry. Some even enjoy dessert-inspired toppings such as s’mores or cheesecake. These mix-ins make your homemade yogurt exciting and delicious.
Note: Try new flavors and toppings to keep your yogurt snacks interesting!
Making yogurt at home is easy and fun. You can pick the taste and texture you like. You also choose what goes into your yogurt each time. Many people save money by making yogurt at home. It can cost as little as $0.23 for each serving. This saves a lot over a year. Homemade yogurt has more probiotics and fewer extra ingredients. This is good for your stomach and health. You can try different milks or starter cultures to see what you like best. Do you have questions or want to share your ideas?
Leave a comment below and be part of the homemade yogurt group!
You can keep homemade yogurt in your fridge for about 1 to 2 weeks. Always use a clean spoon when you scoop yogurt. If you see mold or smell something odd, it’s time to throw it out.
Yes, you can use your homemade yogurt as a starter. Just save a few tablespoons from your last batch. Fresh yogurt works best. After a few rounds, start with a new store-bought or powdered starter for the best results.
Runny yogurt often means the milk was too cool or the starter was weak. Make sure you heat the milk to 180°F and cool it to 110°F before adding the starter. Use fresh yogurt with live cultures for a thicker result.
You can make non-dairy yogurt with soy, coconut, or almond milk. Use a vegan starter and add a thickener like agar agar. Non-dairy yogurt may turn out softer, but it still tastes great and works in many recipes.


